Flex 2

overlaying VideoDisplay with constrained fluid layout

UPDATE 28 April 2010 : This subject is revisited in relation to Flex 4 spark components, here.

The problem: In Flex, how to overlay the video with something (e.g. a logo or caption) and keep the overlay relative to a corner of the actual video rectangle. Sounds like it should be a simple matter of creating a container and layering in the VideoDisplay instance and the over lay instance ? But…

In each of the following samples:
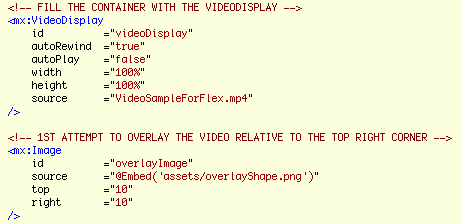
Video Display overlay Sample 1

In our first sample we simply place our overlay image using attributes ‘top’ and ‘right’ to keep the overlay’s top-right corner to 10px in from the VideoDisplay top-right corner.

code-snippet

It basically looks fine until you hit the play button and start resizing the panel.


As you can see the actual video within the VideoDisplay is constrained by its rectangle and depending on the differing aspect ratios, there will either be black space at the sides or the top, and our overlay is faithfully anchored to top right corner of the VideoDisplay and looks odd unless the aspect ratios are equal.

So how to solve this?

Looking at the documentation for VideoDisplay, there are many width and height properties to play with, however none of these relate to the current width and height or position of the contained video rectangle. You might think while looking at the documentation that the videoWidth and videoHeight properties might give the values we are after, but not so. They only return the ‘original’ width and height of the loaded video.

Fortunately the OpenSource nature of the Flex SDK and the magic of, holding the command key on a Mac (control key on a PC) with the cursor over  the <mx:VideoDisplay> opening tag, then clicking it as it underlines,  (using in Flash Builder  or Flex Builder) will open the source for the VideoDisplay component within a new editor. Browsing through the code you will see at line 198:
mx_internal var videoPlayer:VideoPlayer = null;

It is this videoPlayer instance who’s properties we need to monitor to calculate our overlay’s position. The instance is not generally exposed through the VideoDisplay component’s api. Nor is it documented. However since it has been placed in the mx_internal name space, we can actually access it with namespace notation…

videoDisplay.mx_internal::videoPlayer.attribute

Where we replace ‘attribute’ with the property name we are after, so the following would be of use to us…

videoDisplay.mx_internal::videoPlayer.x
videoDisplay.mx_internal::videoPlayer.y
videoDisplay.mx_internal::videoPlayer.width
videoDisplay.mx_internal::videoPlayer.height

Video Display overlay Sample 2

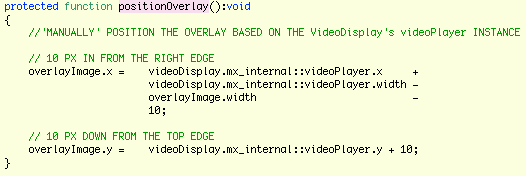
In this second sample, we create a positionOverlay method and call it from the resize event of the VideoDisplay component. Within positionOverlay we use the name space notation to get the videoPlayer properties and use some basic maths to reposition our overlay based on the top-right corner of the videoPlayer instance rather than the videoDisplay instance.

code-snippet

Additionally we call positionOverlay from our applicationComplete handler to set the initial position.


This basically seems ok, but play with it for a while and it is clear that something is wrong…

  • Resizing slowly, seems ok
  • Resizing quickly, and there seems to be some lag in the position of the overlay
  • Release the resize handle while resizing quickly and the overlay can be left behind in completely the wrong place

Having traced the videoPlayer instance properties from within the positionOverlay handler, it is apparent that while the videoDisplay properties are correct, the videoPlayer properties are as they were previously. i.e. as they were rather than as they shall be.

Video Display overlay Sample 3 – This one works properly!

This is where Player version 10 comes in. It added Event.EXIT_FRAME. (If your project targets a player older than 10, you will not see this event in your code assist.) If we use the exit frame event to defer the call to overlayPosition, we can then get measured values from videoPlayer and correctly position the overlay.

To do this I have created a new method positionOverlayOnExitFrame who’s job is to add an EXIT_FRAME listener who’s handler will be overlayPosition. The first job of which is to remove the listener, so that it only gets called once. By using a listener we need to change the interface of overlayPosition to accept an Event argument. But we are not interested in the event information and we still wish to call positionOverlay directly, so we have allowed the argument to have a null default.

code-snippet

Playing with the resize handle now, no-matter how quickly it is moved, shows no lag, and always drops in the correct place.


Finally, just to re-iterate, source code zip for these examples is here.

Note: These samples were built against Flex SDK version 3.4.

Note: I haven’t found any official documentation relating to when Event.EXIT_FRAME arrived in the player runtime. The Flash CS4 documentation for Event.EXIT_FRAME indicates player 9. However unless you target player 10 in Flex/Flash Builder, you will get compile errors. If anyone has accurate references, please post to the comments – thanks.

Note: When you look at the source view, it appears ragged. This is because in creating the HTML, Flash builder simply converts tab characters to four space characters. Clearly not every tab in my code actually represents 4 characters and therefore what should look like neat columns becomes ragged. I have filed a bug/enhancement request. If you too would like this fixed, feel free to add your vote to FB-23060.

Posted by creacog in Adobe, Flex, Flex 2, Flex 3, Flex Components, 1 comment

more mvc with lfpug

Over the past few months I’ve been getting my head around the likes of Cairngorm, PureMVC and better use of design patterns in general. So looking forward to tonight’s LFPUG to see what the Slide Framework For Flex adds to the mix. The other stuff on large datasets looks pretty good too!

Posted by creacog in ActionScript, Adobe, AIR, Flex, Flex 2, Flex 3, Flex Builder, User Groups, 0 comments

A flurry of events : Adobe/Flash/Flex

A busy few weeks starting tonight:

  1. [Thurs 21-Feb-2008] LFPUG – Thermo Special presentation from Adobe
  2. [Mon 25-Feb-2008] Adobe sponsored Pokercoder Tournament II  – you need to be a professional user of Adobe products to join in
  3. [Thurs 28-Feb-2008] LFPUG – presentations on ‘Successful Flash Games’ and ‘Practical Particle Effects with Flint’
  4. [Wed 5th March] FLUG – Beer, presentations and chat about Flex
Posted by creacog in ActionScript, Adobe, AIR, CS3, DreamWeaver, Fireworks, Flash Platform, Flex, Flex 2, Flex 3, Flex Builder, 0 comments

sensible(ish) code print from flex builder (on MacOS X)

Continuing the theme of occasional Flex Builder hints and tips…

Occasionally I need to see code printed on paper. Unfortunately the printing capabilities of Flex Builder, or more specifically in this case, Eclipse, are a bit messy…

  • the font is huge, and only 49 lines fit on an A4 page
  • if you have a background colour set to your code window, it gets printed – decimating your ink-tanks
  • printing is a two dialogue process – you have to go through Page Setup each and every time.

Of course in the actual Print dialogue, you have the standard Mac ability to change the page layout, paper handling etc, and save that detail in a pre-set. However…

The key things I want to achieve is to print 2up full duplex black and white, which gives me four pages of code per sheet of A4, and with a slightly smaller font size I get a more respectable 68 lines of code per ‘page’.

However I’ve found the following approach, once set-up, a little more convenient, and becomes a one-click print…

The Mac has a GNU enscript installed which converts text files to PostScript to send directly to CUPS. In my case I had to update the old Gimp-Print drivers to the current Guten-Print drivers in order to achieve duplex printing.

More information on Guten-Print and access to the drivers on SourceForge. The DMG contains good documentation and a simple package installer.

Once the new drivers are installed, and I’d recommend a new, additional, print queue be set up with appropriate defaults for your code printing, you need to set Eclipse to run an external script to print the currently active code window. From the menu: Run > External Tools > External Tools…

  • Name: enscript
  • Location: /usr/bin/enscript
  • Arguments: -2rT4v -DDuplex:true -diP5000 ${container_loc}/${resource_name}

Obviously you’ll need to tweak the arguments according to your personal print configuration.

External Tools Dialogue

Posted by creacog in Adobe, Eclipse, Flex, Flex 2, Flex 3, Mac OS, 0 comments

option up and down

Kicking myself for not finding these sooner so, posting in line with the current trend of highlighting little Flex time-savers. Two ActionScript editor short-cuts (and probably apply to any Eclipse code editor?)…

1. Select some code in the ActionScript editor and press Option-Up or Option-Down, and the selected block of code gets moved accordingly. Or just place the cursor on a line if you only wish to move a single line. Saves a load of messing with Cut-Paste.

2. Need to duplicate a line? Place the cursor at the start of the line and press either CMD-Option-Up or CMD-Option-Down, and the current line (or selection if you have one) gets duped above or below the cursor respectively.

With either of the above, if you make a selection, you don’t need to be character accurate. The movement is applied either to the line touched by the cursor, or the lines touched by the selection. i.e. If you select part of a line, the whole of that line is included in the selection to be moved.

Posted by creacog in ActionScript, Eclipse, Flex, Flex 2, Flex 3, 1 comment

flex, mac, external browser

Ted Patrick has been quite prolific of late at publishing little productivity hints and tips. I think this one from a couple of weeks ago is worth echoing and noting the workaround for the problem it raises on a Mac.

We are setting up Builder to launch the help pages into an external browser. The key advantage of which being that the code samples can then be copy/pasted. On a Mac there is a recognised bug in eclipse that if you choose Firefox as the external browser, and it is NOT your normal system default browser. Basically Eclipse attempts to launch a second instance of Firefox which will generate the “Only one copy of Firefox can be open at a time” dialogue…

Firefox close dialogue

So to get around this, you have two options.

Option 1, if you have Firefox as your default browser for the entire system, simply choose “Default system Web browser” in the Eclipse preferences panel.

Option 2, if you want to keep something else set as your system default browser e.g. Safari, but would use Firefox for displaying Flex Builder help, you need to either edit or create a new external browser entry using a command structure as per comment 5 on the eclipse bug sheet. Essentially the following settings work…

  • Location: /usr/bin/open
  • Parameters: -a firefox %URL%

Flex Builder > General > Web Browser >Edit external browser

Posted by creacog in Bug, Eclipse, Flex, Flex 2, Flex 3, Mac OS, 1 comment

flash, flex and vice versa

I have a small AS3 project where I need to keep the SWF quite small. I really want to use the Flex Builder environment to do the coding, and ultimately produce a target or targets suitable for inclusion both in Flash and/or Flex projects.

Two very helpful posts of the last couple of days with respect to setting up a suitable environment:

Posted by creacog in Adobe, CS3, Flash Platform, Flex 2, Flex 3, 1 comment

essential actionscript 3 published today?

I don’t have my hands on it yet. I do have it on pre-order. Although at time of writing, Amazon is still showing it as ‘not yet published’, today is the official publish date. If it’s predecessors are anything to go by, this really will be the one book any ActionScript programmer should always have to hand. For more information and samples, check the author’s blog.

Update: Must be in high demand! Going to have to wait until at least 11th July 2007 for my copy.

Update (14 July 2007): my new “Estimated arrival date: 25/07/07 – 30/07/07” from Amazon.

Posted by creacog in ActionScript, Adobe, CS3, Flash Platform, Flex, Flex 2, Flex 3, 0 comments

tile or repeat an image into a flex application background II

Back in November 2006, I made a step-by-step post of how to locate, copy and adapt the ApplicationBackground class from the Flex SDK, in order to tile an image across that background.

This is simply an update to that post, this time with source-code and the addition a sample of a tile image within a Canvas. You are free to take and re-use this code as you see fit.

The following examples use a programmatic skin approach, and rely on the image being embedded at compile time. This is a quick and dirty method. For more information on programmatic skins, please refer to Aral Balkin’s Quick-Start on the Adobe site.

You can get your hands on the source with a right-click (control-click on a Mac) on the following examples.

Application tile background

In this sample we have created our own ApplicationBackground class and and applied it within the Application tag. You can change the repeat policy by uncommenting the appropriate line within uk.co.creacog.skins.ApplicationBackground . Choose this link if you wish to view example 1 in a new window.

You need JavaScript and Flash plug-in 9 to view this sample.

Canvas tile background

The key thing to be aware of is that the component background is actually controled by the a decorator class primarily designed to control the component border. So in this example we are applying our uk.co.creacog.skins.CanvasBackground to the borderSkin of the Canvas component. I added a slider to control the corner radius to demonstrate that we can have both rounded corners and a tile background. Note: that the borderStyle of the the Canvas need to be set to “solid” in order for the borderSkin to be invoked. In addition the onus is upon us as the programmer of the skin to respond to the cornerRadius values. In this case by calling drawRoundRectComplex.

Should we need a drop-shadow, again the onus is upon us to implement it within our custom skin. I did not take the example that far. The information you need to do so is in Aral’s article.

Again, choose this link if you wish to view example 2 in a new window.

You need JavaScript and Flash plug-in 9 to view this sample.

Other ways

Other authors have documented approaches with variations which might suit you better. You may find the following useful…

If you know of better ways, please do add links to the comments.

I haven’t got my hands on the Flex 3 beta yet. I have my finger’s crossed that these approaches might become obsolete with the new framework?

Posted by creacog in ActionScript, Adobe, Flex, Flex 2, 7 comments

tile or repeat an image into a flex application background

UPDATE: There is a revised version of this post here, which you might find more accessible. It also includes a tile into the background of a Canvas.

I’ve only been using Flex for a few weeks via the Flex Builder Beta for the Mac. While I am really impressed with the ease of use of the framework, and now something of a convert, I was suprised by the apparent inability to tile (or repeat) an image over the background of the Application.

I tried a number of approaches which I now look back on as naive. I haven’t at this point managed to find a documented solution by googling. Though as responses to this post show (update: source now published), there seems to be interest in finding a solution.

So here is one solution. I don’t claim this to be ‘best practice’. Far from it. But it works, and will suffice for me until I am more familiar with Flex.

  1. Locate your flex installation, then Flex SDK 2/frameworks/source
  2. From here navigate the package structure to mx.skins.halo
  3. Duplicate file “ApplicationBackground.as” to a suitable location within your project file structure. In my case saved to ‘{projectroot}/com/ct/skins”
  4. Edit your local copy as per the following notes

Adjust the package detail

In my case the package line now reads:

package com.ct.skins

Add some imports

We need the following import lines to access the bitmap data:

import flash.display.Bitmap;
import flash.display.BitmapData;

Remove the version include

Because we are working outside the structure of the halo skin collection, we no-longer need or want the following line:
include "../../core/Version.as";

Embed the image and declare some variables

In this case I am embedding the image at compile time:

[ Embed( source='/assets/BackgroundLines.png' ) ]
private var backgroundImageClass :Class;
private var backgroundImage :Bitmap;
private var backgroundBitmapData :BitmapData;

Modify the constructor

In our constructor, after the call to ‘super()’ we need to get the bitmap data of the image into the backgroundBitmapData variable, we do this by first creating a Bitmap instance of the embedded image in backgroundImage, then drawing the data into backgroundBitmapData:

backgroundImage = new backgroundImageClass();
backgroundBitmapData
= new BitmapData( backgroundImage.width, backgroundImage.height );
backgroundBitmapData.draw( backgroundImage );

Clear out and replace the content of updateDisplayList

The only line we need keep is the super call. Everything else can be replaced with the following 4 lines:

var g:Graphics = graphics;
g.clear();
g.beginBitmapFill( backgroundBitmapData );
g.drawRect(0,0,w,h);

Now we just need to apply it.

All we need to do is point the borderSkin attribute of the mx:Application tag to this new skin. In my case the attributes of mx:Application look like this:

xmlns:mx ="http://www.adobe.com/2006/mxml"
frameRate ="36"
layout ="absolute"
borderSkin ="com.ct.skins.ApplicationBackground"

Bob’s your uncle!

I’d appreciate comments on a better practice approach.

Further reading:

Posted by creacog in ActionScript, Flex, Flex 2, 10 comments