Flex 4

Flex 4 Spark VideoDisplay (measure, overlay, skin)

In a previous article I described some of the steps required in Flex 3 in order to keep an overlay position in sync with a VideoDisplay component. With the release of Flex 4, VideoDisplay is one of the components to be updated. Via VideoPlayer, it gets a Spark makeover. Internally its core, or ‘view’, has been reimplemented using Open Source Media Framework. For anyone wishing to keep an overlay in position over the view, however, the same key issue remains:

None of the various width or height properties of the VideoDisplay component describe the width or height of the contained view.

So, to get the properties of the view we need to delve deeper into VideoDisplay and use the mx_internal namespace. Even then, the ResizeEvent.RESIZE event is broadcast by VideoDisplay before it’s view dimensions (column B) have been updated to the new site.

In that previous article I observed that if, after each resize, I added an Event.EXIT_FRAME listener, I could guarantee that the VideoDisplay’s view had been sized by the time it was called. I observed that the same is true in Flex 4. However EXIT_FRAME didn’t feel like the right place to be doing this. So with a closer look at the component life cycle we can see that handling the FlexEvent.UPDATE_COMPLETE event is more appropriate. Column C shows the view’s width/height after UPDATE_COMPLETE has been broadcast. It colours red when a value  disagrees with column B (RESIZE). And so, it is column C that contains the values we want to use while managing our overlay.


Sample 1 : Comparing width/height after resize, then updateComplete

Using this information and Flex 4’s new component and skinning architecture, we can build quick and simple to use video overlay component rather than messing about with external listeners and calculating positions as we did in the previous Flex 3 examples.

Reviewing what Flex 4 includes ‘out of the box’…

  • VideoDisplay : a non-skinable component that wraps an osmf ‘view’. It translates much of the osmf api and events to what we are accustomed to with Flex 3.
  • VideoPlayer : A skinable component provides hooks for skin parts. A required part is an instance of VideoDisplay. The others are the buttons and controls we’d normally expect when giving the user control of the video.

The VideoPlayer and it’s skin are overkill for this example, so we’ll create something far simpler…

  • VideoDisplayOverlayContainer : A container component who’s children will overlay a VideoDisplay
  • VideoDisplayOverlayContainerSkin : A simple skin, providing the required videoDisplay skin part.

This way, overlaying the video is as simple as giving the container some child components and a layout (defaults to basic layout). In the example that follows we overlay a label instance to each of the four corners and the centre of the view…

<components:VideoDisplayOverlayContainer
    id     ="videoDisplayContainer"
    source ="VideoSampleForFlex.mp4"
    width  ="100%"
    height ="100%" 	>
    <s:Label text="A" top="2" left="2" backgroundColor="0xffffff" backgroundAlpha="0.4" />
    <s:Label text="B" top="2" right="2" backgroundColor="0xffffff" backgroundAlpha="0.4"  />
    <s:Label text="C" bottom="2" left="2" backgroundColor="0xffffff" backgroundAlpha="0.4"  />
    <s:Label text="D" bottom="2" right="2" backgroundColor="0xffffff" backgroundAlpha="0.4"  />
    <s:Label text="O" verticalCenter="0" horizontalCenter="0" backgroundColor="0xffffff" backgroundAlpha="0.4"  />
</components:VideoDisplayOverlayContainer>
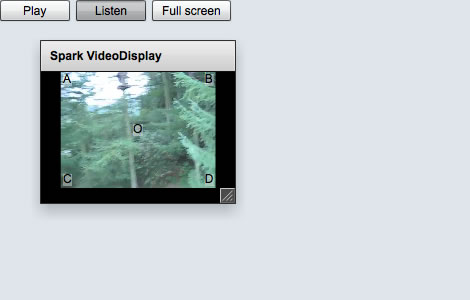


Sample 2 : Overlay container component

View source

Posted by creacog in Adobe, Flash Builder, Flex 4, Flex Components, Spark components, 3 comments

Flex builder 4 help system (CHC) and backups

(Edit: Of course this should have been titled Flash Builder 4)

One of the changes with Flash builder over previous Flex Builder products is in the help system. The help files are no-longer bundled and indexed by eclipse help. Instead a new help application is installed which attempts to combine the documentation with community content.

I must admit to not receiving this application particularly well in the first instance. However I have seen it develop over a number of weeks and as an AIR application it is expected to continue to develop independently of major product release cycles.

Since it is a new product, some rough edges can be expected. There is already a technote (cpsid_83103) relating to getting context-sensitive help working correctly in a fresh install of Flash Builder 4.

Randy Nielsen’s post on using the help client provides a good orientation for new users.

However I think there are some other things that system administrators at least (and users who backup their user-directories – particularly to the cloud) should be aware of…

1. The many names of adobe help

On a Mac it installs application “Adobe Help” into /Applications/Adobe. The main application window when running is titled “Adobe Community Help”. And you will see this application widely referred to in Adobe communications as CHC or Adobe Community Help Client. If you ever look for the preferences files for the application, you’ll find them in ~/Library/preferences/chc.xxxx.1 (where xxxx is a 40 digit hex number). Note: missing is the usual “com.adobe.” prefix.

2. Downloading the help files.

The help files need to be downloaded to your local system in order for the application to work. The current version of the application (3.0.0.400) only displays local content if the network is not available. Otherwise it always displays content from the web. This seems slightly wasteful and slow. Though we can expect an option to default to local content irrespective of network connectivity in future versions.

3. Help file size

You can manually control the downloads via Preferences>Updater settings then  “Manage now”. This will show a table of help files, whether they are current or not and their size. The size however is slightly misleading. It refers to the zip file size and therefore the network bandwidth required to download the help package. Once unzipped however, the disk-space used is a considerably larger number. I find that the help packages for Fb4 and associated stuff expand to use 563Mb.

4. Where the help files are stored

On a mac the help files are expanded and stored in the user’s preferences folder. ~/Library/Preferences/chc.xxxx.1/Local Store/Help

To me this is not the right place to be storing such content. Help content is not preferences and is not necessary ‘per user’. Preferences are usually backed up. There is absolutely no need to be backing up this content – to do so is a waste of storage, network bandwidth and machine time. Once all Adobe products are integrated with CHC, the help folder will be considerably larger than my current 563Mb.

In summary

Adobe Help, Adobe Community Help Client (CHC), is currently in its infancy as an application, but will be soon in the hands of many, many users. As an AIR application, the development team have far more flexibility to make releases between major product cycles. I hope and believe that the points I highlight (and location of help files in particular) will be addressed in coming releases – they have all been submitted to the team – not just blogged here. However they are blogged here because I think storage suppliers could be in for a field day unless sys-admins are made aware, and add rules to their backup process to omit the help files.

Posted by creacog in Adobe, Flash Builder, Flash Platform, Flex, Flex 4, Flex Builder, 1 comment

Flex 4 and Flash builder 4 final, finally released

It’s been a long time coming, but looks worth the wait. Lots of improvements and a fundamental change (enhancement) to the skinning components in the form of Spark. Although Flash Catalyst isn’t released yet, there’s still scope to get to grips with the developer side of the Spark skinning architecture in the meantime.

Although the charting components have now been open-sourced, i.e. you don’t need the professional licence to access them, significant differences make the premium version vital for heavy development e.g. Performance profiler, Memory profiler and network monitor. For more detail check the Flex version comparison chart.

Andrew Shorten’s post on the Official Flex Team Blog is a good start point for getting into this release.

Posted by creacog in Adobe, Flash Builder, Flex 4, 0 comments

my first Flex 4 spark : component + skin = ResizeableTitleWindow

With Flex 4 having been in beta for ages and hopefully soon to be released, it really was time I started to get my head around the spark components and how to approach to skinning them. Rather starting off with the usual button, I thought I’d kick off with getting a ResizeableTitleWindow going. Of course a few others have already created variants. I think everyone using Flex at some point needs a resizeable version of TitleWindow. To that end, looking at the TitleWindow specification page of the Flex 4 wiki, clearly Adobe planned on implementing resize behaviour on the TitleWindow. It doesn’t seem to be implemented yet. So in the meantime my version is as close as I think I can get to that specification.

The end result (view source enabled):

My 1st spark skin

In the running example above, window ‘A’ is a normal instance of spark.components.TitleWindow. This leads me to my first spark skin. If you are viewing on a windows or linux platform it won’t look any different from normal. In that case it is simply using spark.skins.spark.TitleWindowSkin. However if you are viewing on a Mac you’ll notice that the close button is located at the left of the title bar rather than the right. This is where a Mac user will expect it to be – but the default in Flex is currently to the right, no matter what platform. This was achieved through the most basic technique of skinning a spark component : clone an existing skin, adapt it and apply it. To that end, spark.skins.spark.TitleWindowSkin was cloned to creacog.spark.skins.TitleWindowMacSkin, and a couple of lines changed swap around the closeButton and title. We switch skins if we are on the mac platform by loading the compiled Mac style sheet in the preinitialize handler of main.mxml.

This technique of cloning is one thing that initially feels slightly wrong with spark. It leads to a lot of duplicate code which is something developers normally do their best to avoid. The reasoning seems mainly to facilitate Flash Catalyst workflow, where skins are predominantly the domain of interaction designers for whom duplication is the norm and code re-use doesn’t really figure. However until and unless Flash Catalyst matures into a product that can support round-trip editing, there’s a good chance that developers will be making a lot of use of diff tools and duplicate code across skins is something we’ll probably just get used to. The subject has been discussed in detail in a number of other blogs and their comments:

Implementing and skinning ResizeableTitleWindow

We now need to know a little more about the mechanics of spark skinning. I must admit having previously read some blogs and watched some video posts of how simple spark skinning is – and I got it until sitting in-front of an empty editor scratching my head – where to begin? The key thing that crystallised it for me was to read the skinning contract.

So, first was to create the component class. This extends spark.components.TitleWindow. It adds a new optional skin part of resizeHandle of type UIComponent. Essentially we need something the user can click on no matter what it’s appearance. creacog.spark.events.TitleWindowBoundsEvent was created extending spark.events.TitleWindowBoundsEvent with the new event constants for resizing. Using the creacog package is the main deviation from the specification – for obvious reasons.

Catalyst was used to create the ResizeHandleSkin. A simple custom component with two states: up and over. It has a semi-transparent white background that transitions it’s alpha on mouse over. Importing ResizeHandle.fxpl into the flex project resulted in slightly odd packaging. Simply moving ResizeHandle.mxml to the creacog.spark.skins package brought it into structure consistent with the rest of the project.

spark.skins.spark.TitleWindowSkin was again cloned, this time to creacog.spark.skins.ResizeableTitleWindowSkin. To that 3 new lines is all that was required to add an instance of the resizeHandle skin part – positioned front-most and at the bottom right corner. It could be any size and positioned anywhere, but the logic behind resize adjusts the width and height of the component, leaving it’s x and y untouched.

creacog.spark.skins.ResizeableTitleWindowMacSkin is a further clone, this time with the closeButton skin part positioned to the left for mac users.

Finally we use styles (being careful of  the new namespace syntax) to the  notify the flex framework to use creacog.spark.skins.ResizeableTitleWindowSkin (and substitute creacog.spark.skins.ResizeableTitleWindowMacSkin on the Mac) whenever a ResizeableTitleWindow instance is drawn. If we omitted this step, the ResizeableTitleWindow instance would be created, but it would fall back to using the TitleWindowSkin which does not include the resizeHandle skin part and therefore the resizing functionality would be ignored.

Summing up

This new approach to skinning components feels far superior to what we have been used to in Flex 3. I’m slightly scared that the workflow from designer  via catalyst could result in inflexible skins (at least in the short term), as post-production work is required of the developer if the skin is intended to take on runtime styling for example. Lack of any sign of round-trip capability means skin production is currently one way from catalyst. i.e. tweaks or changes within catalyst will create a new output and it will be for the developer to merge the changes with additions s/he may have implemented on previous skins.

Looking forward to getting going on some real flex 4 projects.