Flex 4 and Flash builder 4 final, finally released

It’s been a long time coming, but looks worth the wait. Lots of improvements and a fundamental change (enhancement) to the skinning components in the form of Spark. Although Flash Catalyst isn’t released yet, there’s still scope to get to grips with the developer side of the Spark skinning architecture in the meantime.

Although the charting components have now been open-sourced, i.e. you don’t need the professional licence to access them, significant differences make the premium version vital for heavy development e.g. Performance profiler, Memory profiler and network monitor. For more detail check the Flex version comparison chart.

Andrew Shorten’s post on the Official Flex Team Blog is a good start point for getting into this release.

Posted by creacog in Adobe, Flash Builder, Flex 4, 0 comments

my first Flex 4 spark : component + skin = ResizeableTitleWindow

With Flex 4 having been in beta for ages and hopefully soon to be released, it really was time I started to get my head around the spark components and how to approach to skinning them. Rather starting off with the usual button, I thought I’d kick off with getting a ResizeableTitleWindow going. Of course a few others have already created variants. I think everyone using Flex at some point needs a resizeable version of TitleWindow. To that end, looking at the TitleWindow specification page of the Flex 4 wiki, clearly Adobe planned on implementing resize behaviour on the TitleWindow. It doesn’t seem to be implemented yet. So in the meantime my version is as close as I think I can get to that specification.

The end result (view source enabled):

My 1st spark skin

In the running example above, window ‘A’ is a normal instance of spark.components.TitleWindow. This leads me to my first spark skin. If you are viewing on a windows or linux platform it won’t look any different from normal. In that case it is simply using spark.skins.spark.TitleWindowSkin. However if you are viewing on a Mac you’ll notice that the close button is located at the left of the title bar rather than the right. This is where a Mac user will expect it to be – but the default in Flex is currently to the right, no matter what platform. This was achieved through the most basic technique of skinning a spark component : clone an existing skin, adapt it and apply it. To that end, spark.skins.spark.TitleWindowSkin was cloned to creacog.spark.skins.TitleWindowMacSkin, and a couple of lines changed swap around the closeButton and title. We switch skins if we are on the mac platform by loading the compiled Mac style sheet in the preinitialize handler of main.mxml.

This technique of cloning is one thing that initially feels slightly wrong with spark. It leads to a lot of duplicate code which is something developers normally do their best to avoid. The reasoning seems mainly to facilitate Flash Catalyst workflow, where skins are predominantly the domain of interaction designers for whom duplication is the norm and code re-use doesn’t really figure. However until and unless Flash Catalyst matures into a product that can support round-trip editing, there’s a good chance that developers will be making a lot of use of diff tools and duplicate code across skins is something we’ll probably just get used to. The subject has been discussed in detail in a number of other blogs and their comments:

Implementing and skinning ResizeableTitleWindow

We now need to know a little more about the mechanics of spark skinning. I must admit having previously read some blogs and watched some video posts of how simple spark skinning is – and I got it until sitting in-front of an empty editor scratching my head – where to begin? The key thing that crystallised it for me was to read the skinning contract.

So, first was to create the component class. This extends spark.components.TitleWindow. It adds a new optional skin part of resizeHandle of type UIComponent. Essentially we need something the user can click on no matter what it’s appearance. creacog.spark.events.TitleWindowBoundsEvent was created extending spark.events.TitleWindowBoundsEvent with the new event constants for resizing. Using the creacog package is the main deviation from the specification – for obvious reasons.

Catalyst was used to create the ResizeHandleSkin. A simple custom component with two states: up and over. It has a semi-transparent white background that transitions it’s alpha on mouse over. Importing ResizeHandle.fxpl into the flex project resulted in slightly odd packaging. Simply moving ResizeHandle.mxml to the creacog.spark.skins package brought it into structure consistent with the rest of the project.

spark.skins.spark.TitleWindowSkin was again cloned, this time to creacog.spark.skins.ResizeableTitleWindowSkin. To that 3 new lines is all that was required to add an instance of the resizeHandle skin part – positioned front-most and at the bottom right corner. It could be any size and positioned anywhere, but the logic behind resize adjusts the width and height of the component, leaving it’s x and y untouched.

creacog.spark.skins.ResizeableTitleWindowMacSkin is a further clone, this time with the closeButton skin part positioned to the left for mac users.

Finally we use styles (being careful of  the new namespace syntax) to the  notify the flex framework to use creacog.spark.skins.ResizeableTitleWindowSkin (and substitute creacog.spark.skins.ResizeableTitleWindowMacSkin on the Mac) whenever a ResizeableTitleWindow instance is drawn. If we omitted this step, the ResizeableTitleWindow instance would be created, but it would fall back to using the TitleWindowSkin which does not include the resizeHandle skin part and therefore the resizing functionality would be ignored.

Summing up

This new approach to skinning components feels far superior to what we have been used to in Flex 3. I’m slightly scared that the workflow from designer  via catalyst could result in inflexible skins (at least in the short term), as post-production work is required of the developer if the skin is intended to take on runtime styling for example. Lack of any sign of round-trip capability means skin production is currently one way from catalyst. i.e. tweaks or changes within catalyst will create a new output and it will be for the developer to merge the changes with additions s/he may have implemented on previous skins.

Looking forward to getting going on some real flex 4 projects.

Posted by creacog in Flash Builder, Flex 4, Spark components, 0 comments

to learn more about Flash Player internals

Being of a Computer Science background I think it useful if not important that developers have some understanding of what’s going on behind the scenes. It can be a real time saver in choosing the right approach in solving a particular problem. In the Flex framework for example, we have full access to the source code via the open source SDK. However for some decisions it is handy to know the low level implementation. The Flash Player tends to be something a black-box with our knowledge constrained to the documentation which largely covers the ‘what’ is available — but only at a high level ever covers the ‘why’ or ‘how’.

To that end it is especially good to see Tinic Uro finding enough time to blog more frequently recently particularly with the changes for Flash Player 10.1. Tinic’s blog is essential reading for any Flash developer. The two most recent posts:

Posted by creacog in Flash Platform, Flex, 0 comments

5 days of Flash 5

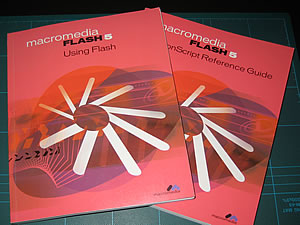
Flash 5 User manuals As we look forward to the release of CS5 before long, I had an unusual 5 days producing a new SWF based on a publish-to Flash Player 5 predecessor. So time to put on my Macromedia cap and dig out the old Flash 5 manuals.

This version pre-dates my working with Flash and dates back to when I quite frankly hated Flash. Ironically a number of designer types look on these as the good old days when Flash was very much a designer tool. I have to admit when I first saw Flash V1 further back in 1996 I didn’t rate it. I’d been using programming Director since 1993 and Flash didn’t have Lingo so it had seemed a step backwards to me.

Back to the current project, since most of flash 5 was easily described in two skinny manuals, there wasn’t really that much to have to read up on. The main issues encountered:

  • The original designer seemed to have no discernible logic to the placement of graphics and their anchor points.
  • Static text didn’t render particularly well — over-anti-aliased.
  • Initially had problems with artwork imported from Illustrator

As regards the Illustrator problem, I had imported an .ai document to library and used on stage. Then while publishing I received an error alert :

This movie uses features that are not supported in Flash Player 5. View the Output Panel for details.

In the Output Panel, the message:

Enhanced stroke is not supported in this player

Simply solved by opening the .ai document in Illustrator then exporting a SWF. At which point it is possible to specify the Flash Player version. So saving off a Flash Player 5 SWF and importing that the Flash library rather than the .ai document avoids the problem.

As regards the text problem, this proved to be the motivation enough for the client to agree to updating the target player version from version 5 to version 8 in order to take advantage of ‘anti-alias for readability’.

Sometimes I wish Adobe would obsolete old versions — much like the current pressure to remove support for explorer 6 from the web. On the other hand I have to admire the facilities across Adobe tools that continue support output to legacy flash player versions for when it is impossible to persuade clients to be more current.

Posted by creacog in Flash Platform, 0 comments

flash in the pan

Observing and requesting better support for panning (horizontal as well as vertical scrolling) in Flash player across all OS platforms and runtimes via ubiquitous input devices.

Posted by creacog in Adobe, AIR, Flash Platform, Flex, Mac OS, 0 comments

MacPro early 2008 video card dies

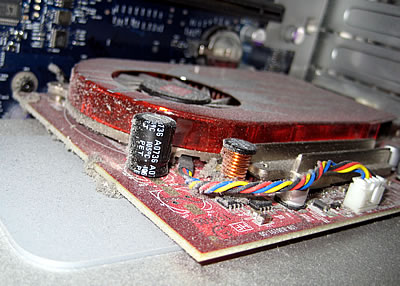
A couple of months ago, during a particularly busy period of work, I started to suffer some quite strange symptoms with my MacPro. Essentially, ‘sometimes’ if the system went to sleep, it was not possible to properly wake it up. It was apparent that the machine was starting up, but there was no video signal to either of the two monitors attached. One being an Apple 23 inch LCD. The other being an old CRT. The only way to get back to a working condition being to force-shutdown and restart the system.

My first suspect was one of the monitors – possibly the LCD. But trying them individually and swapping the connectors over made no difference.

The next suspect being the video card. Taking a look inside, there was a shocking amount of dust build up. I removed the card and gave it a good clean. Unfortunately this didn’t solve the problem. Over the next few weeks the occurrence increased in frequency to the point where one Sunday, after 7 or 8 reboots, it was time for more drastic action.

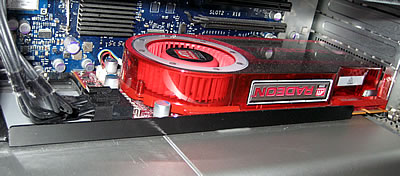
ATI Radeon HD 2600 XT

I had found a discussion on the Apple support site which echoed the symptoms and seemed to confirm the video card being at fault. My Mac was out of warranty and I needed it working for the next day and so trekked to the Regent Street Apple Store. Really busy store – the worse part was trying to get the attention of a member of staff. But then it was plain sailing. I explained the issue. While he suggested it might make sense to bring in the Mac to be checked – doing so would have been a real pain, run up cost and taken ages. I was pretty confident in my diagnosis. The only option available was an upgrade – which I was pretty happy with. From reading the rest of the support discussion I really didn’t want to replace like with like.

So, £300 lighter I trekked back home with a Apple Mini-DVI to DVI Adapter and a 512Mb ATI Radeon HD 4870. Very releived that the item was in-stock.

It dwarfs the old card, taking up two slots and full width. Installation was not too hard. The worst bit trying to connect the extra power cables to the mother-board.

ATI Radeon HD 4870

Closed the machine and restarted. The new card was picked up immediately. No installation of drivers required. Note: I had been a little worried that drivers may be required as I had previously considered upgrading to  an NVIDIA® GeForce® GTX 285, for which I read that it was vital to install the drivers prior to installing the card. Something difficult to achieve if the old card is dead!

Summing up – very happy so far with the new ATI Radeon HD 4870 which has been running faultless for the last couple of months, and looking forward to more software making user of the GPU, particularly from the likes of Adobe.

Posted by creacog in Apple, 2 comments

Editor bug in Mac OS X 10.6.1

UPDATE 22 June 2010 : Further to my even earlier bug report (FB-9398FlashApe has posted a work around by changing a Snow Leopard system preference.

UPDATE 10-Dec-2009: I’m pretty convinced now that this is an editor bug, not a Mac OS X bug. Essentially the editors are using default OS behaviour which I think is tailored for natural language editing rather than programme-code editing. Original post follows…

I’m currently finding in some applications that “word1.word2.word3” is being treated as a single word as far as the Option-Left Arrow and Option-Right Arrow is concerned on my Mac. This keyboard shortcut should hop word by word. But currently hops from one end to the other. Not an issue for most users, but pretty serious for a programmer working with dot-notation syntax.

I first experienced this working with ActionScript in Adobe’s Flash Builder Beta 2 and logged a bug report, but further investigation reveals that some unrelated applications show the same behaviour. I have now logged a bug with Apple, but in the meantime I would be interested to know if others are experiencing the same? Or if you are running 10.6.1 and not seeing this issue? Please add a comment – I’m still trying to work out if it is something installed on my system. I don’t think it is basic user preferences as I am seeing the same in another user-account on this system.

Editors incorrectly treating “word1.word2.word3” as a single word re opt-left and opt-right:

FlexBuilder 3 MXML and AS editors
FlashBuilder 4 Beta2 MXML and AS editors
Apple Mail
Apple OS textfields including:
Spotlight
Finder window findfield
Safari: form-textfields + google search field
editors with *correct* opt-left opt-right behaviour
TextWrangler
Adobe Flash CS4 IDE ActionScript Editor
Adobe DreamWeaver CS4 editor
Apple XCode editor
Apple Finder – filename clicked and editable when renaming
Firefox form-textfields and goodle search field
  • FlexBuilder 3 MXML and AS editors
  • FlashBuilder 4 Beta2 MXML and AS editors
  • Apple Mail
  • Apple OS TextFields including:
  • Spotlight
  • Finder window find-file
  • Safari: form-textfields & google search field

Editors showing correct opt-left opt-right behaviour:

  • TextWrangler
  • Adobe Flash CS4 IDE ActionScript Editor
  • Adobe DreamWeaver CS4 editor
  • Apple XCode editor
  • Apple Finder – filename clicked and editable when renaming
  • Firefox form-textfields and goodle search field
Posted by creacog in ActionScript, Apple, Flex, Mac OS, 0 comments

overlaying VideoDisplay with constrained fluid layout

UPDATE 28 April 2010 : This subject is revisited in relation to Flex 4 spark components, here.

The problem: In Flex, how to overlay the video with something (e.g. a logo or caption) and keep the overlay relative to a corner of the actual video rectangle. Sounds like it should be a simple matter of creating a container and layering in the VideoDisplay instance and the over lay instance ? But…

In each of the following samples:

Video Display overlay Sample 1

In our first sample we simply place our overlay image using attributes ‘top’ and ‘right’ to keep the overlay’s top-right corner to 10px in from the VideoDisplay top-right corner.
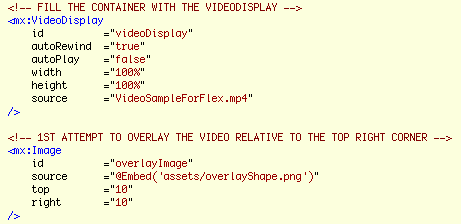
code-snippet

It basically looks fine until you hit the play button and start resizing the panel.


As you can see the actual video within the VideoDisplay is constrained by its rectangle and depending on the differing aspect ratios, there will either be black space at the sides or the top, and our overlay is faithfully anchored to top right corner of the VideoDisplay and looks odd unless the aspect ratios are equal.

So how to solve this?

Looking at the documentation for VideoDisplay, there are many width and height properties to play with, however none of these relate to the current width and height or position of the contained video rectangle. You might think while looking at the documentation that the videoWidth and videoHeight properties might give the values we are after, but not so. They only return the ‘original’ width and height of the loaded video.

Fortunately the OpenSource nature of the Flex SDK and the magic of, holding the command key on a Mac (control key on a PC) with the cursor over  the <mx:VideoDisplay> opening tag, then clicking it as it underlines,  (using in Flash Builder  or Flex Builder) will open the source for the VideoDisplay component within a new editor. Browsing through the code you will see at line 198:
mx_internal var videoPlayer:VideoPlayer = null;

It is this videoPlayer instance who’s properties we need to monitor to calculate our overlay’s position. The instance is not generally exposed through the VideoDisplay component’s api. Nor is it documented. However since it has been placed in the mx_internal name space, we can actually access it with namespace notation…

videoDisplay.mx_internal::videoPlayer.attribute

Where we replace ‘attribute’ with the property name we are after, so the following would be of use to us…

videoDisplay.mx_internal::videoPlayer.x
videoDisplay.mx_internal::videoPlayer.y
videoDisplay.mx_internal::videoPlayer.width
videoDisplay.mx_internal::videoPlayer.height

Video Display overlay Sample 2

In this second sample, we create a positionOverlay method and call it from the resize event of the VideoDisplay component. Within positionOverlay we use the name space notation to get the videoPlayer properties and use some basic maths to reposition our overlay based on the top-right corner of the videoPlayer instance rather than the videoDisplay instance.
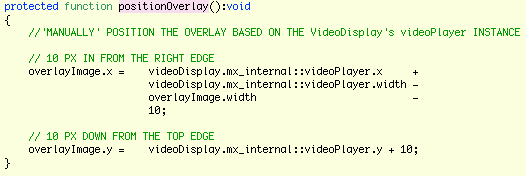
code-snippet

Additionally we call positionOverlay from our applicationComplete handler to set the initial position.


This basically seems ok, but play with it for a while and it is clear that something is wrong…

  • Resizing slowly, seems ok
  • Resizing quickly, and there seems to be some lag in the position of the overlay
  • Release the resize handle while resizing quickly and the overlay can be left behind in completely the wrong place

Having traced the videoPlayer instance properties from within the positionOverlay handler, it is apparent that while the videoDisplay properties are correct, the videoPlayer properties are as they were previously. i.e. as they were rather than as they shall be.

Video Display overlay Sample 3 – This one works properly!

This is where Player version 10 comes in. It added Event.EXIT_FRAME. (If your project targets a player older than 10, you will not see this event in your code assist.) If we use the exit frame event to defer the call to overlayPosition, we can then get measured values from videoPlayer and correctly position the overlay.

To do this I have created a new method positionOverlayOnExitFrame who’s job is to add an EXIT_FRAME listener who’s handler will be overlayPosition. The first job of which is to remove the listener, so that it only gets called once. By using a listener we need to change the interface of overlayPosition to accept an Event argument. But we are not interested in the event information and we still wish to call positionOverlay directly, so we have allowed the argument to have a null default.
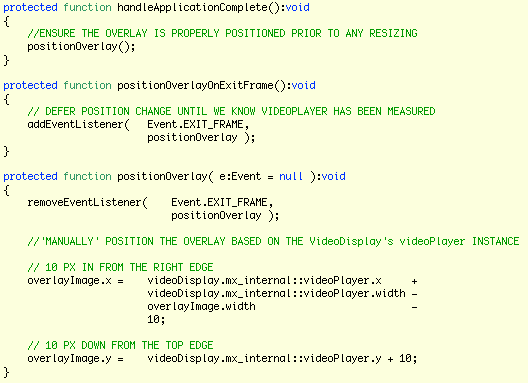
code-snippet

Playing with the resize handle now, no-matter how quickly it is moved, shows no lag, and always drops in the correct place.


Finally, just to re-iterate, source code zip for these examples is here.

Note: These samples were built against Flex SDK version 3.4.

Note: I haven’t found any official documentation relating to when Event.EXIT_FRAME arrived in the player runtime. The Flash CS4 documentation for Event.EXIT_FRAME indicates player 9. However unless you target player 10 in Flex/Flash Builder, you will get compile errors. If anyone has accurate references, please post to the comments – thanks.

Note: When you look at the source view, it appears ragged. This is because in creating the HTML, Flash builder simply converts tab characters to four space characters. Clearly not every tab in my code actually represents 4 characters and therefore what should look like neat columns becomes ragged. I have filed a bug/enhancement request. If you too would like this fixed, feel free to add your vote to FB-23060.
Posted by creacog in Adobe, Flex, Flex 2, Flex 3, Flex Components, 1 comment

No CMD-SPACE in Flash Builder since Snow Leopard

Ok so CMD-SPACE is the default short cut to launch Spotlight. But I wanted that combo for ‘content assist’ with Flex/Flash Builder. Until installing Snow Leopard, that is what I had for a few years, and Spotlight relegated to CTRL-SPACE. However since SnowLeopard, the CMD-SPACE combo is not transmitted to Flash Builder. I assume this is down to Snow Leopard somehow reserving the combination. So begrudgingly I have returned to defaults…

Spotlight : CMD-SPACE
Flash Builder content assist : CTRL-SPACE

Posted by creacog in Flash Builder, Flex Builder, Mac OS, 3 comments

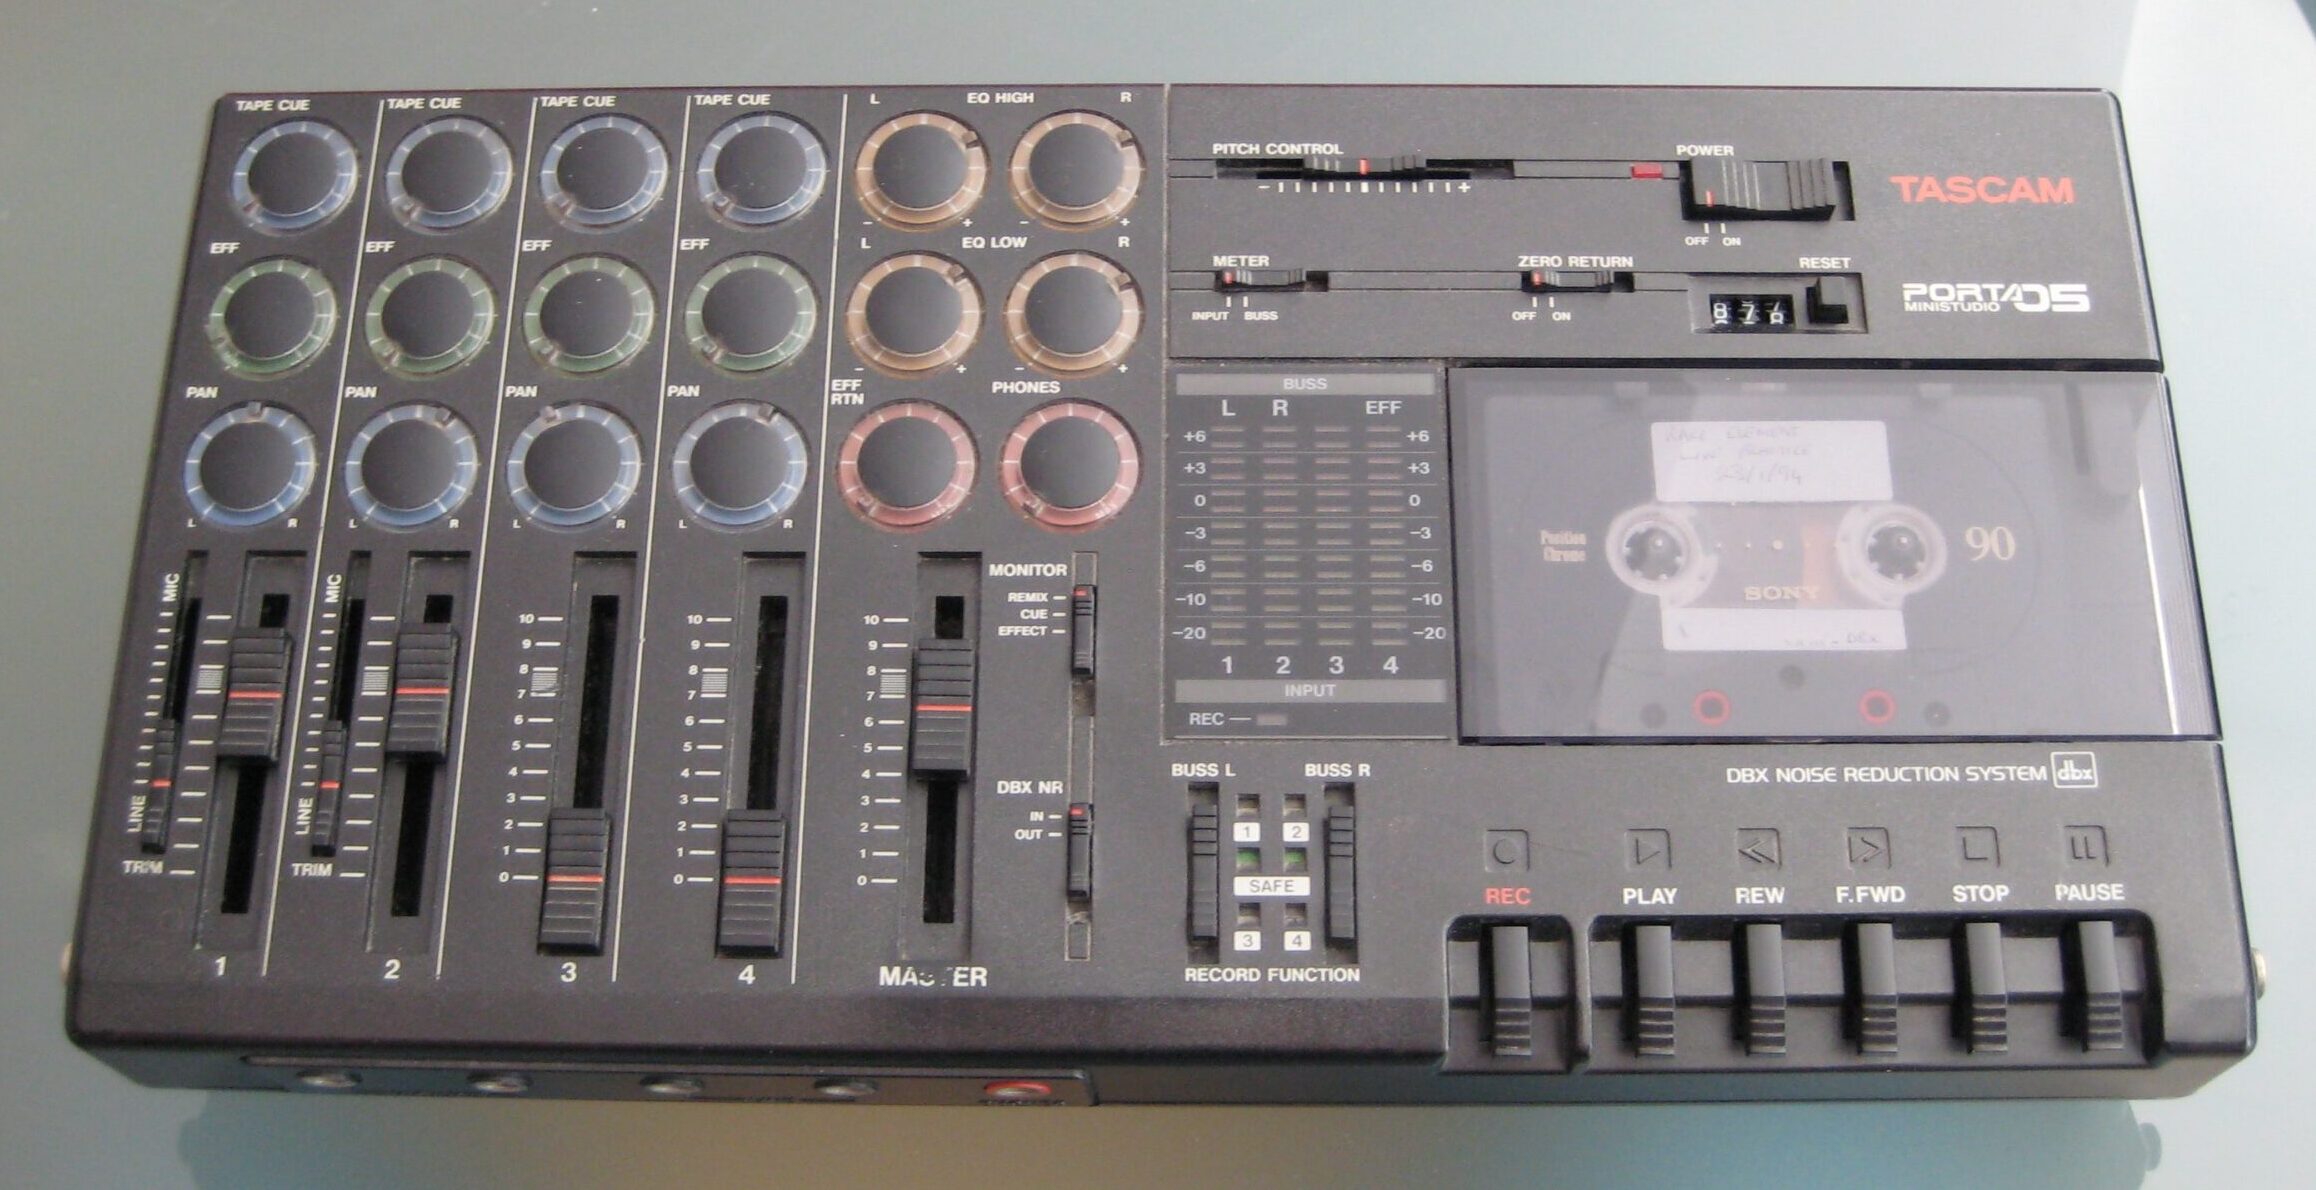
resurrected my tascam porta 05

(Update: 9/9/2020 – higher resolution images)

Tascam Porta 05

Tascam Porta 05

Decided to dig out my old Tascam Porta 05 ministudio in order to digitise some old 4-track recordings. But, found that the play heads seemed to be stuck in the forward position. Full symptoms and notes:

  • Power on ok
  • Impossible to insert a cassette due to the position of the heads
  • Can hear the motor (which turns all the time power is on – this is normal)
  • Motor responds correctly to the pitch control
  • Fast forward button works – spins the central right capstan
  • Rewind button works – spins the central left capstan
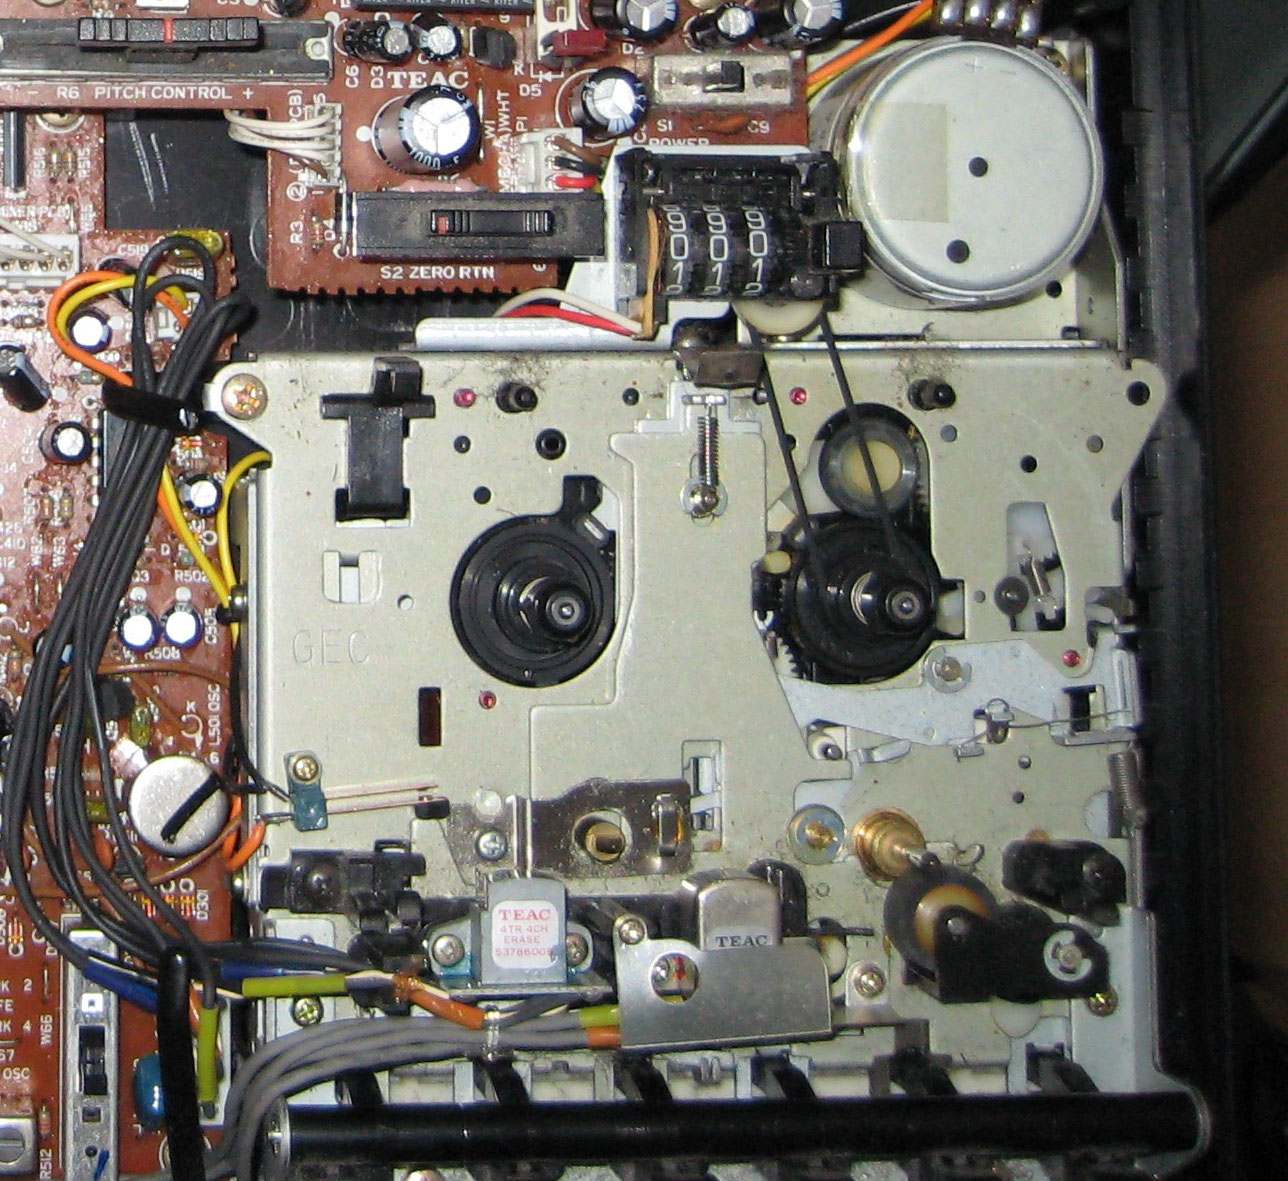
  • Tape heads in forwards position, but the rubber wheel in front of the stop button is not forward enough to press against the metal capstan
  • The metal capstan, which should normally be spinning all the time the machine is powered is not actually spinning
  • Pressing play or record buttons does nothing – the central capstans that would fit into the tape spindles do not turn

I did google around trying to find a solution. I did find a couple of people with the same problem, but no solution posted. I googled for the service manual with no result other than someone in the states selling on ebay for around $22. I wish companies like this would get their service manuals PDF’d and onto the web – shouldn’t be an issue for what is essentially obsolete equipment?

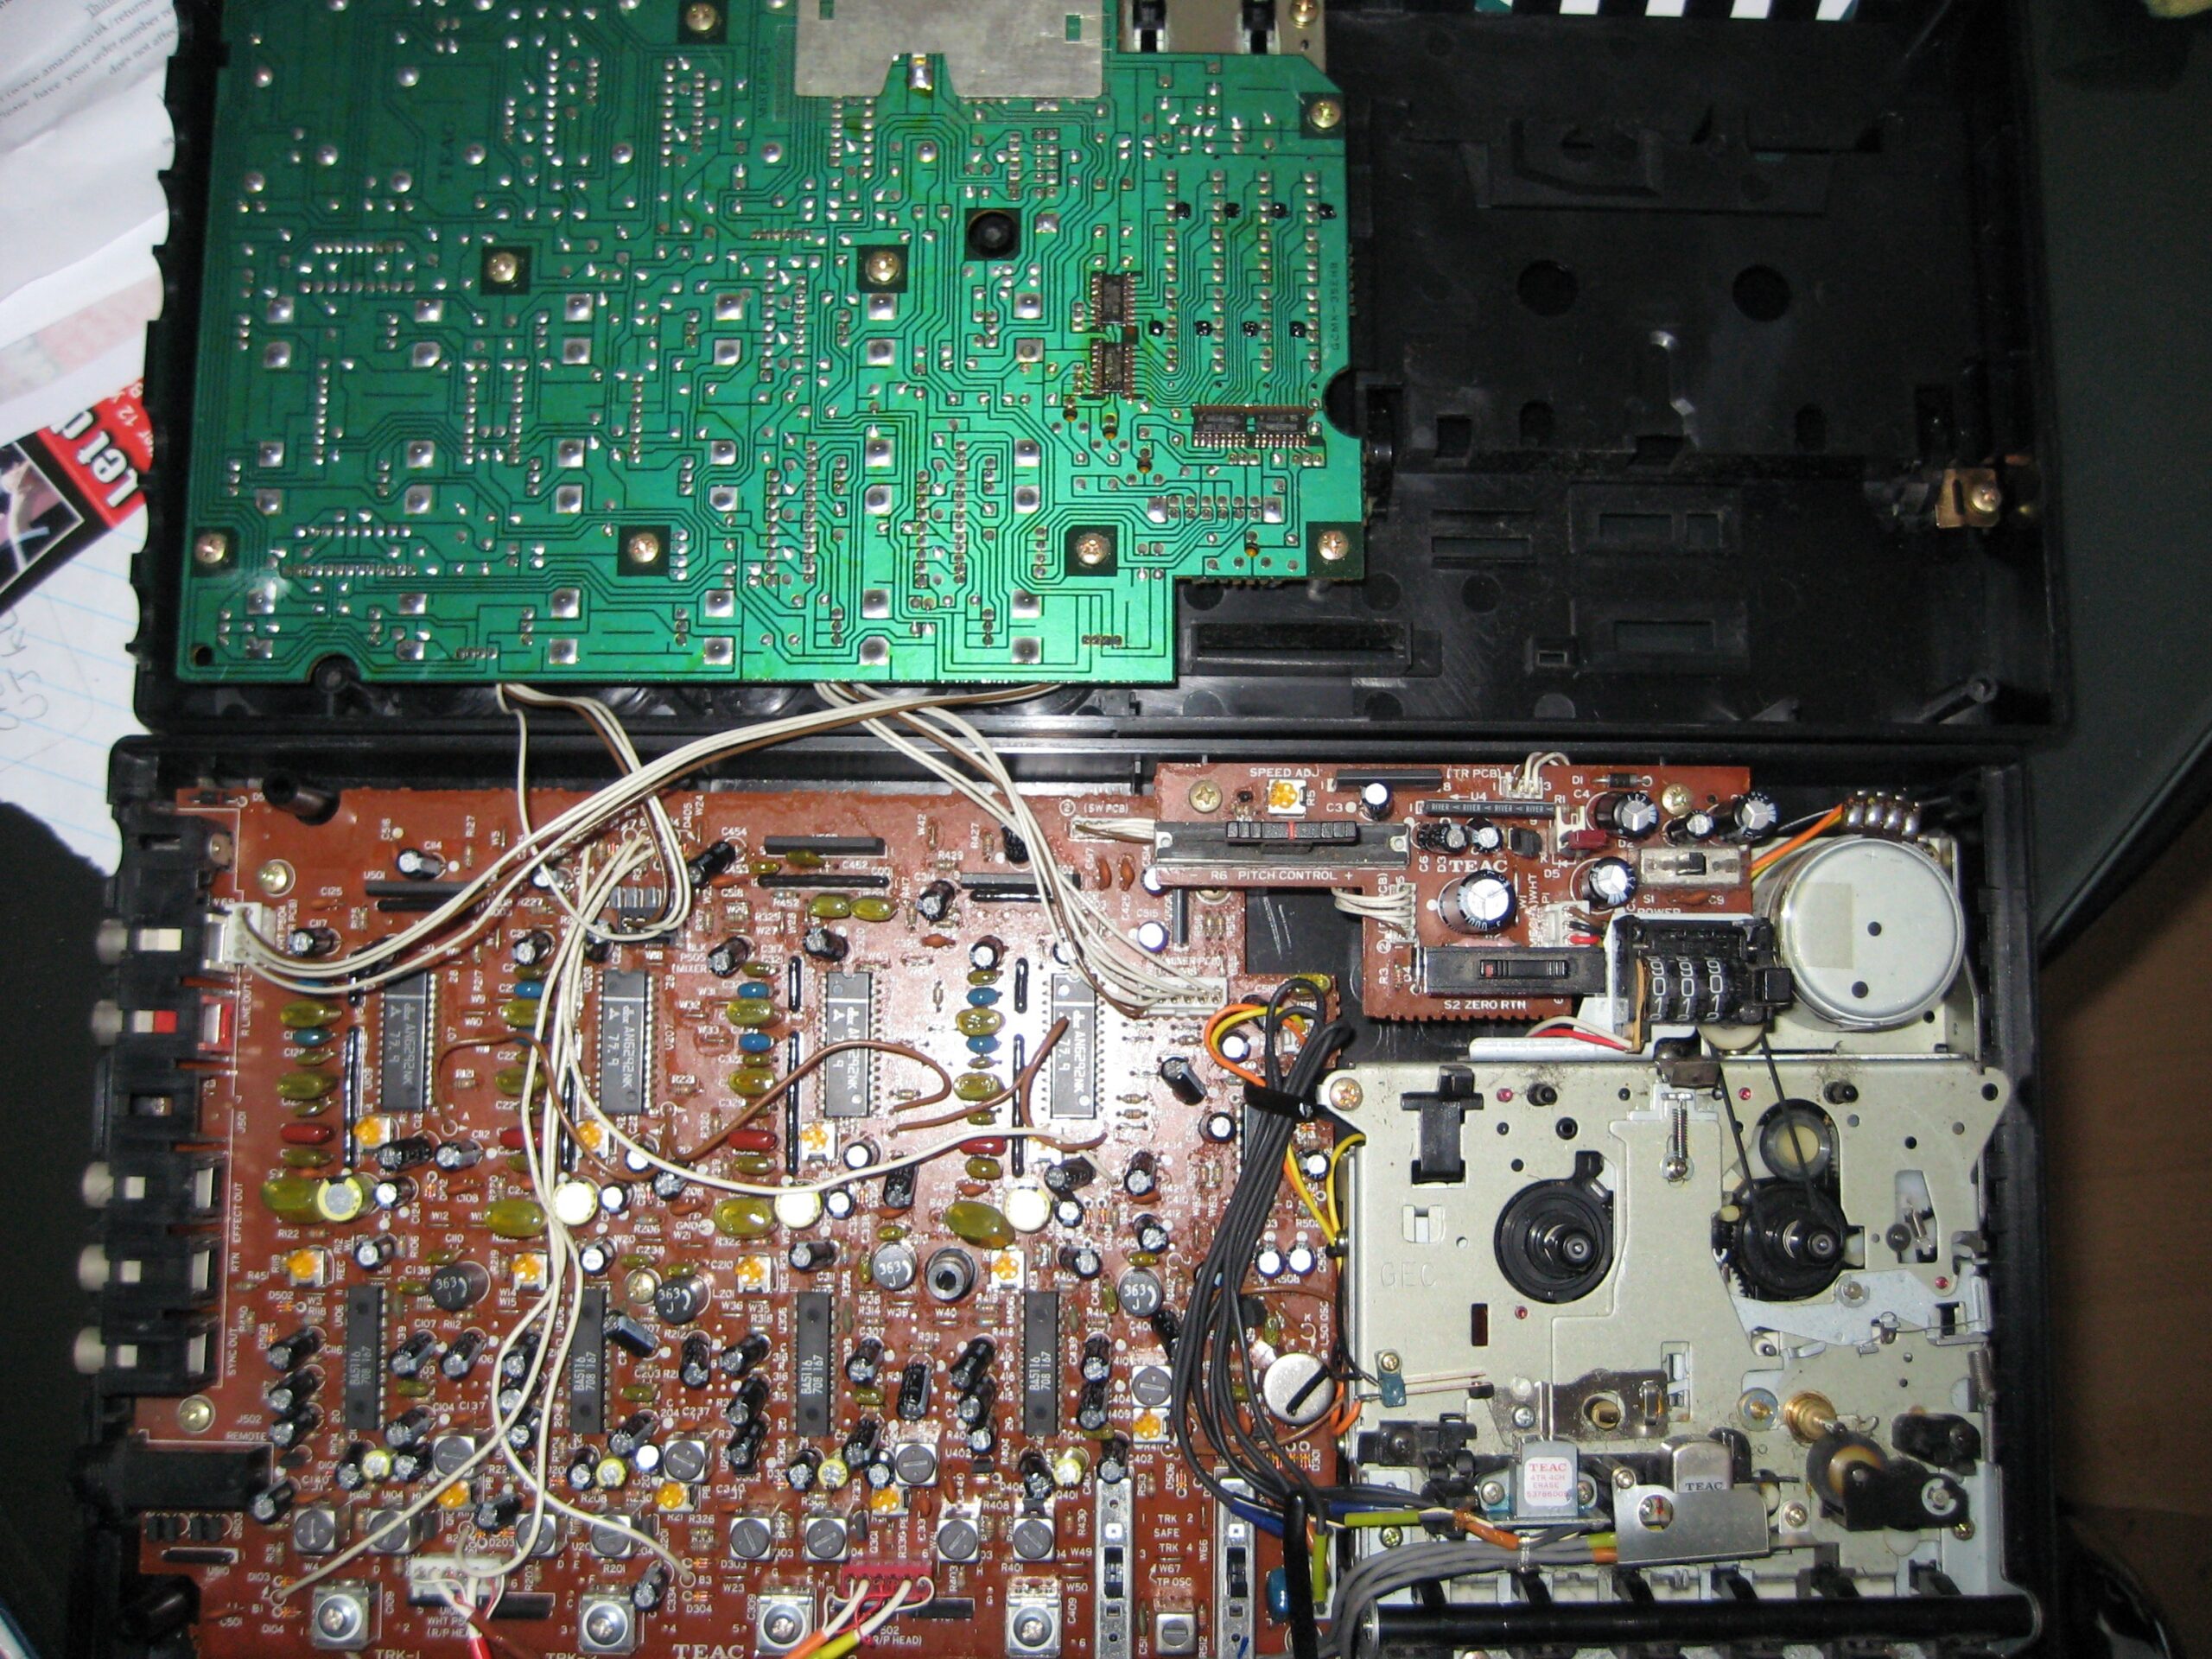
Anyway, with no solution available from the outside, I decided to take a quick look inside to see if there was anything obviously out of place. Getting inside is easy:

  1. Remove the 5 screws from the back panel
  2. Carefully part the two sides noting that:
    • The power on/off slider will likely drop out as it detaches from the internal control
    • all the other sliders remain with the top of the case – but some detach in the process from the underlying control which remains in the base.
    • In my case the forward position of the tape heads was preventing the sides from separating. Pressing them back by pressing the plastic between the erase and write heads made enough space.

Inside the Tascam Porta 05

Close-up showing heads fixed forward

With the sides parted, I then powered up and observed the mechanics when pressing the various control buttons. I couldn’t see anything obvious, but then noticed that underneath the controls is a flywheel attached to that capstan in-front of the stop button. The flywheel is belt-driven and was not spinning.

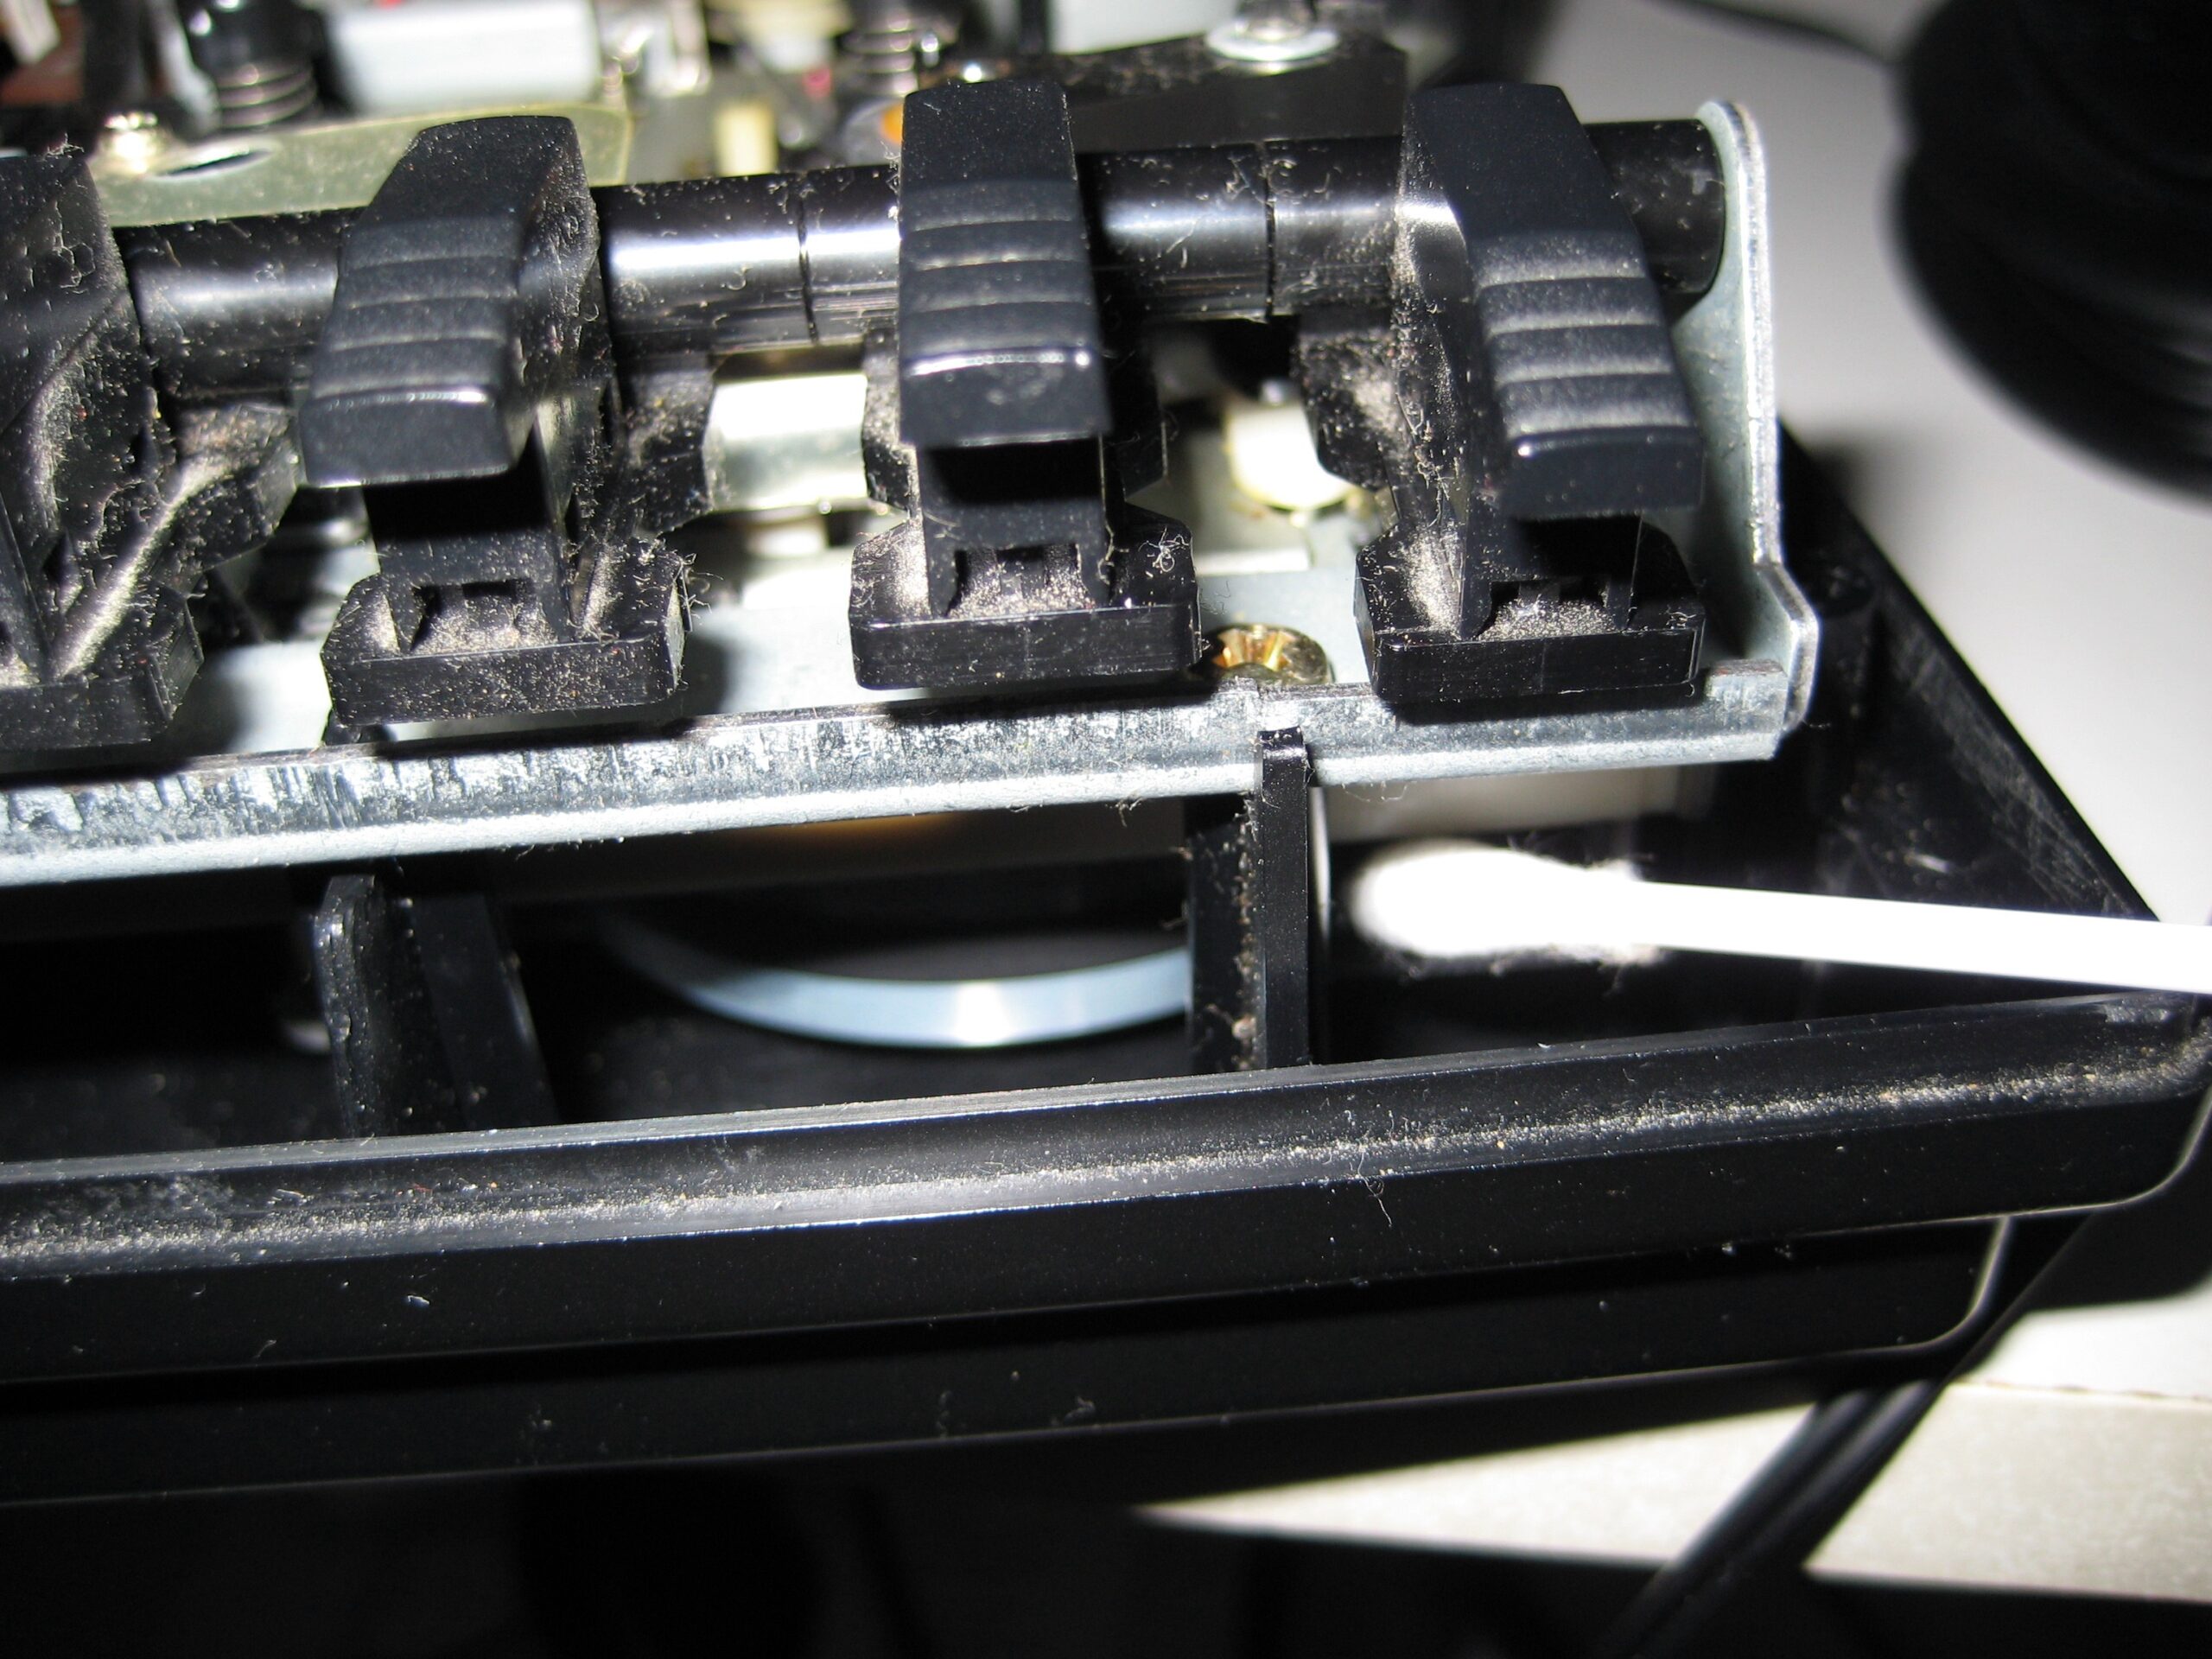
Nudging the fly-wheel with a cotton-bud.

Using a cotton bud, I gave it a few nudges, attempting to pushing it round in either direction. I was quite surprised  after a few attempts when the belt picked up and the flywheel turned under the power of the motor. At the same time the heads snapped back into the retracted position, and the play and record buttons now worked.

All that remained was to give it a good clean-out and reassemble. Taking care to align the Record function sliders with their underlying controls, and get the 5 screws back in, and I am back in action with kit that I thought was pretty cutting edge back in 1987.

Posted by creacog in Personal, Sounds, 65 comments